The Pillar Gate
Six checks, in order. Each one has to pass before you're allowed to look at the next. If any gate fails, the setup is dead — don't skip ahead and don't force it. This is the entire method compressed into one sequence; everything else on this page is detail underneath one of these six steps.
Mark the Turtle Soup (TS)
Locate a potential reversal point near resting liquidity — a rejection block, order block, or eFVG. Check it against ICT kill-zone timing and where you are in current time context. A TS outside a kill zone carries higher probability than one forming inside one.
Ball-knowledge confluence
Near the marked TS, look for an unmitigated high-probability PD array, hourly PO3 context (OHLC / OLHC), and macro time windows lining up with the same level.
Protected swing check
The high or low printed immediately before the TS must not already be "used." Verify its timing makes sense against ICT kill zones and session logic — a swing formed at a low-probability time is not a valid protected swing.
STDV validation
Plot the fib 0–1 on the swing that comes before the protected one. Check whether the protected swing sits inside STDV logic — one of the two valid reaction ways at level 1 (full breakdown in the STDV Logic tab). If it doesn't validate, the setup does not exist yet.
Sanity check — has HOD/LOD already printed?
Before entering, ask directly: has the high or low of day already been made? If yes, there needs to be a real reason price extends further. Re-confirm through kill-zone timing, STDV, and a refined PDA alignment — run the same check down to the lower timeframe you're entering on.
Execute fractally
Run gates 1–5 down through the timeframes you actually trade — 4H → 1H → 15M → 3M → 1M. Entry sits at the protected high/low itself, optionally refined with a 5-second iFVG. Stop goes behind the protected wick. Target is the next ball-knowledge liquidity draw.
The easier a STDV plots and aligns, the higher the probability. If you're stretching, relabeling swings, or talking yourself into an alignment — that's a low-probability setup. Skip it and wait for the next one.
This looks like a lot written out, but it isn't. "Ball knowledge" in gate 2 just means general market knowledge — obvious liquidity, obvious PDAs, nothing exotic. You do not need time cycles, session models, or any external timing theory layered on top. If you need a separate system to explain why a level matters, it's not this model anymore. Keep it this simple, every time.
STDV Validation Logic
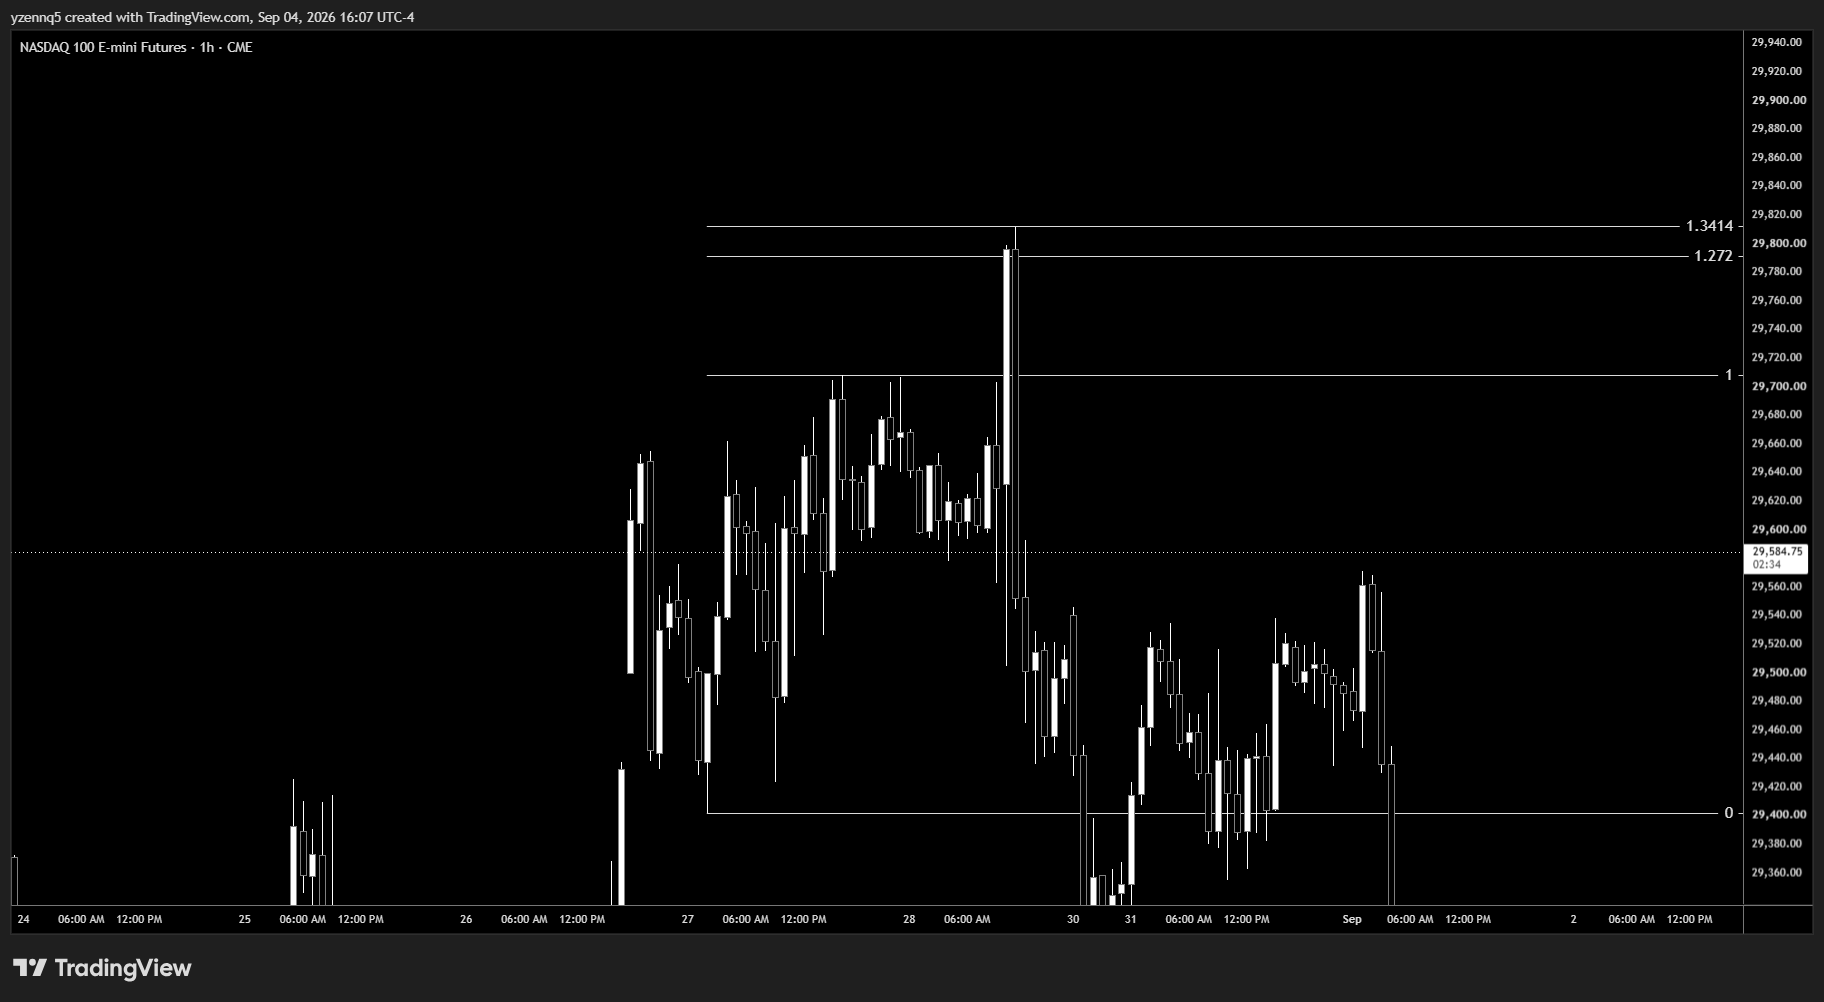
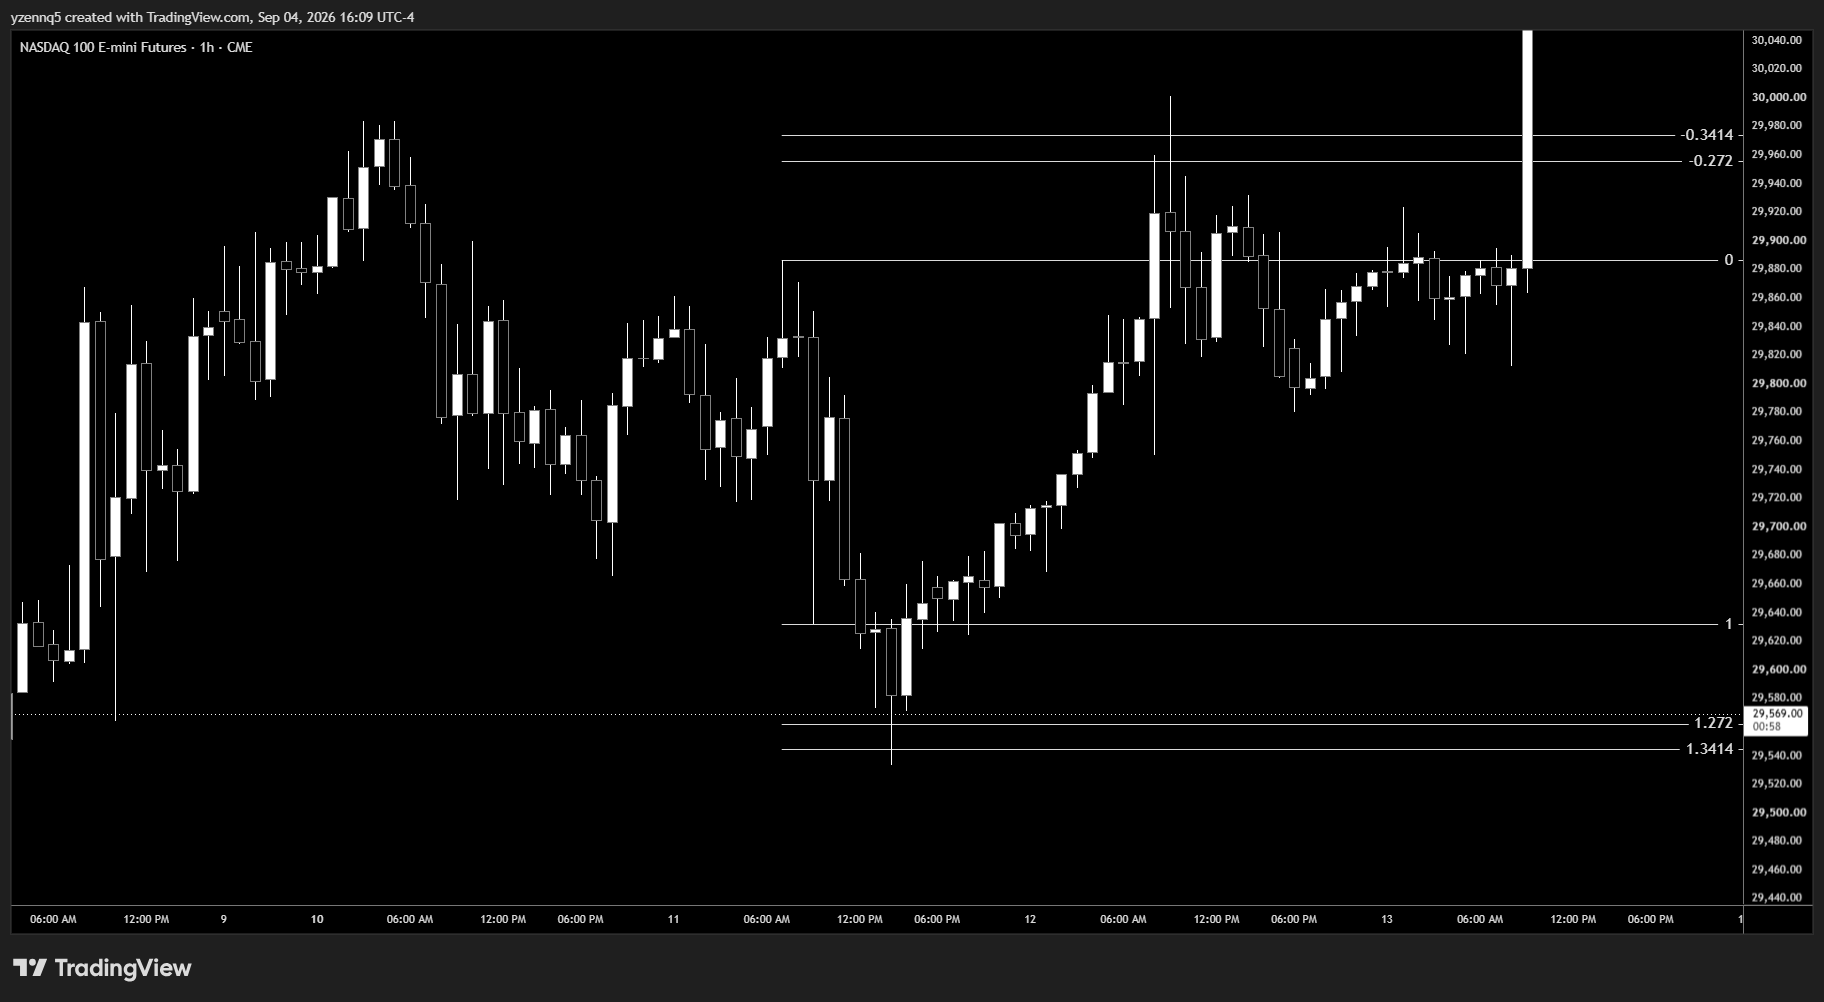
STDV here is not standard deviation — it's a custom fib-based protection check. Plot the 0–1 fib on the swing before the protected swing you're validating. Level 1 of that fib is where the reaction has to happen. There are exactly two valid ways price can react at level 1 — anything else means the swing isn't protected yet.
Wick or body — either can plot the fib
The 0–1 fib can be anchored on the swing's wick (high/low) or on its body (open/close). Use whichever one actually gets the protected swing to align. Neither is "more correct" — the point is alignment, not a fixed rule about which price to anchor on. If wick doesn't line up, try body before discarding the swing.
Shifting the anchor 1–2 candles
Sometimes every other gate is met — TS marked, confluence there, protected swing legit, HOD/LOD sanity check clean — and STDV is the only thing not aligning because the swing you picked sits too far away (e.g. 15 points off). In that case, shift the fib's starting anchor to the 1st or 2nd candle after that prior swing instead of the swing candle itself, and re-check alignment from there.
Only shift the anchor when every other gate already passed and STDV alone is the holdout. If you're shifting candles because nothing else lines up either, that's forcing it — stop and wait for the next setup instead.
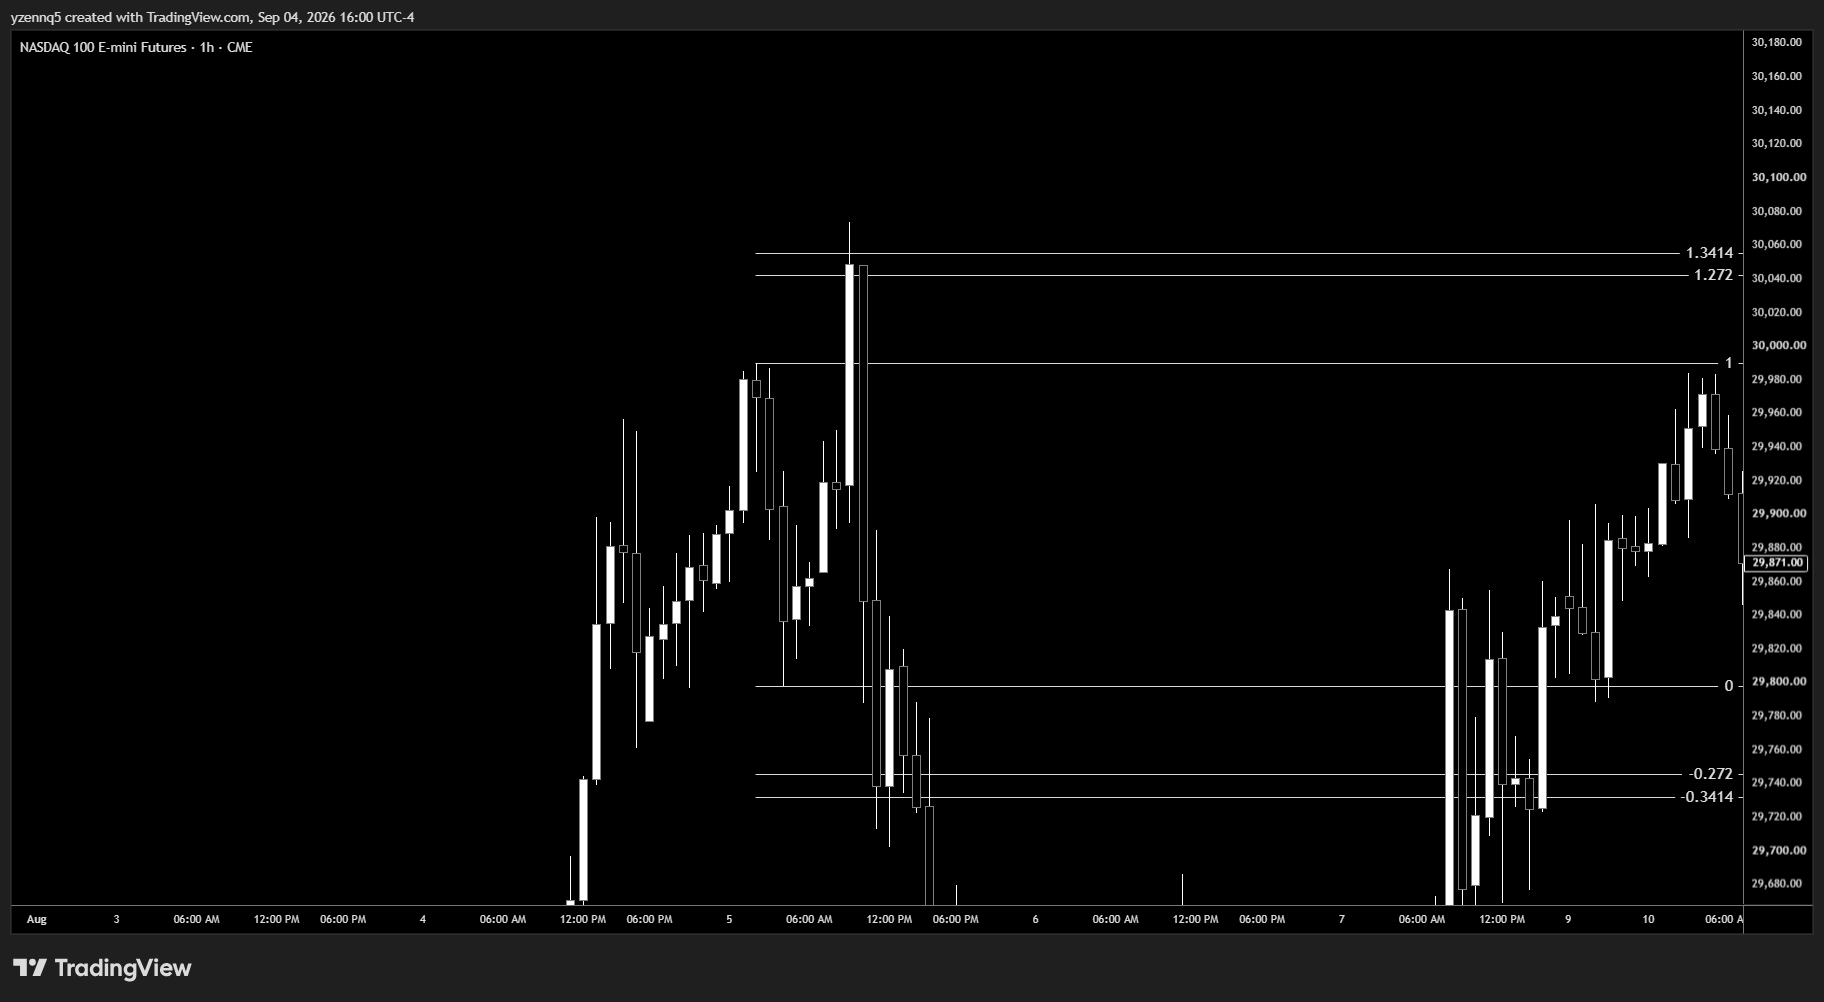
The two valid reaction ways
The first candle to touch level 1 wicks into it and reacts immediately. That candle's high (or low) becomes the protected point — it does not get taken out afterward.
A candle touches both level 1 and level 2, but its body closes back above level 1 (or below, for a low). Same protection rule applies to that candle's extreme.
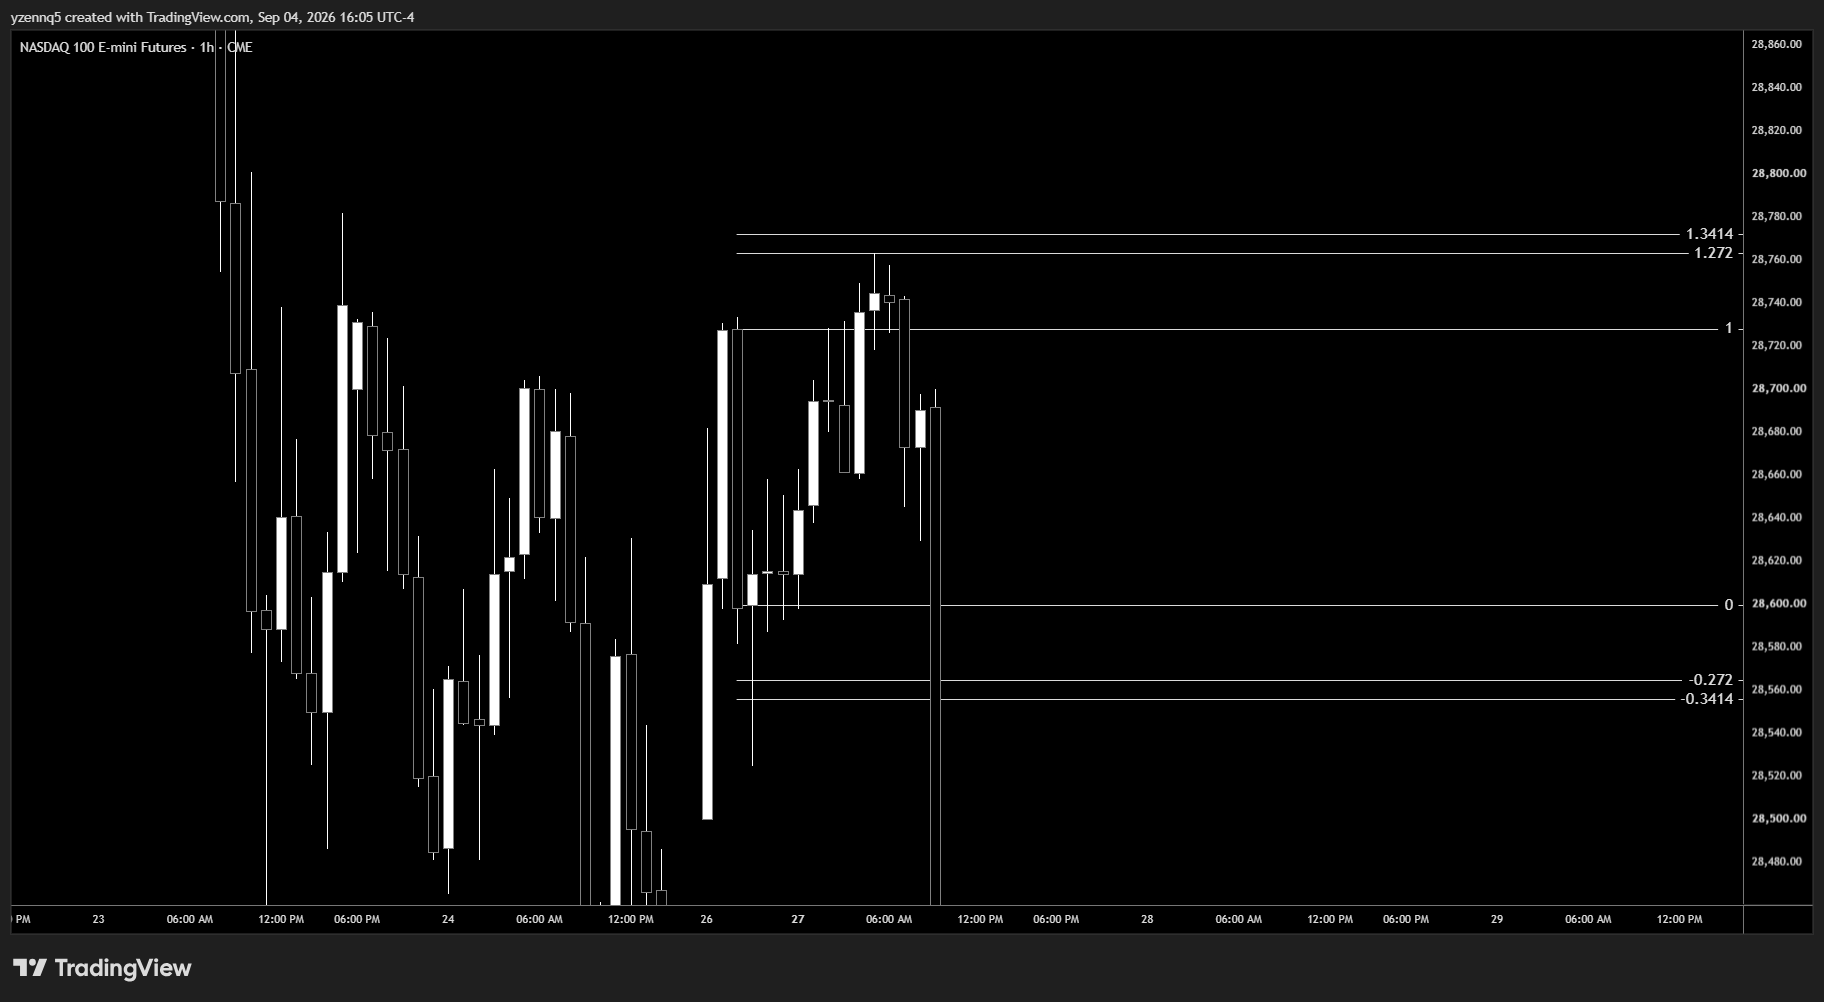
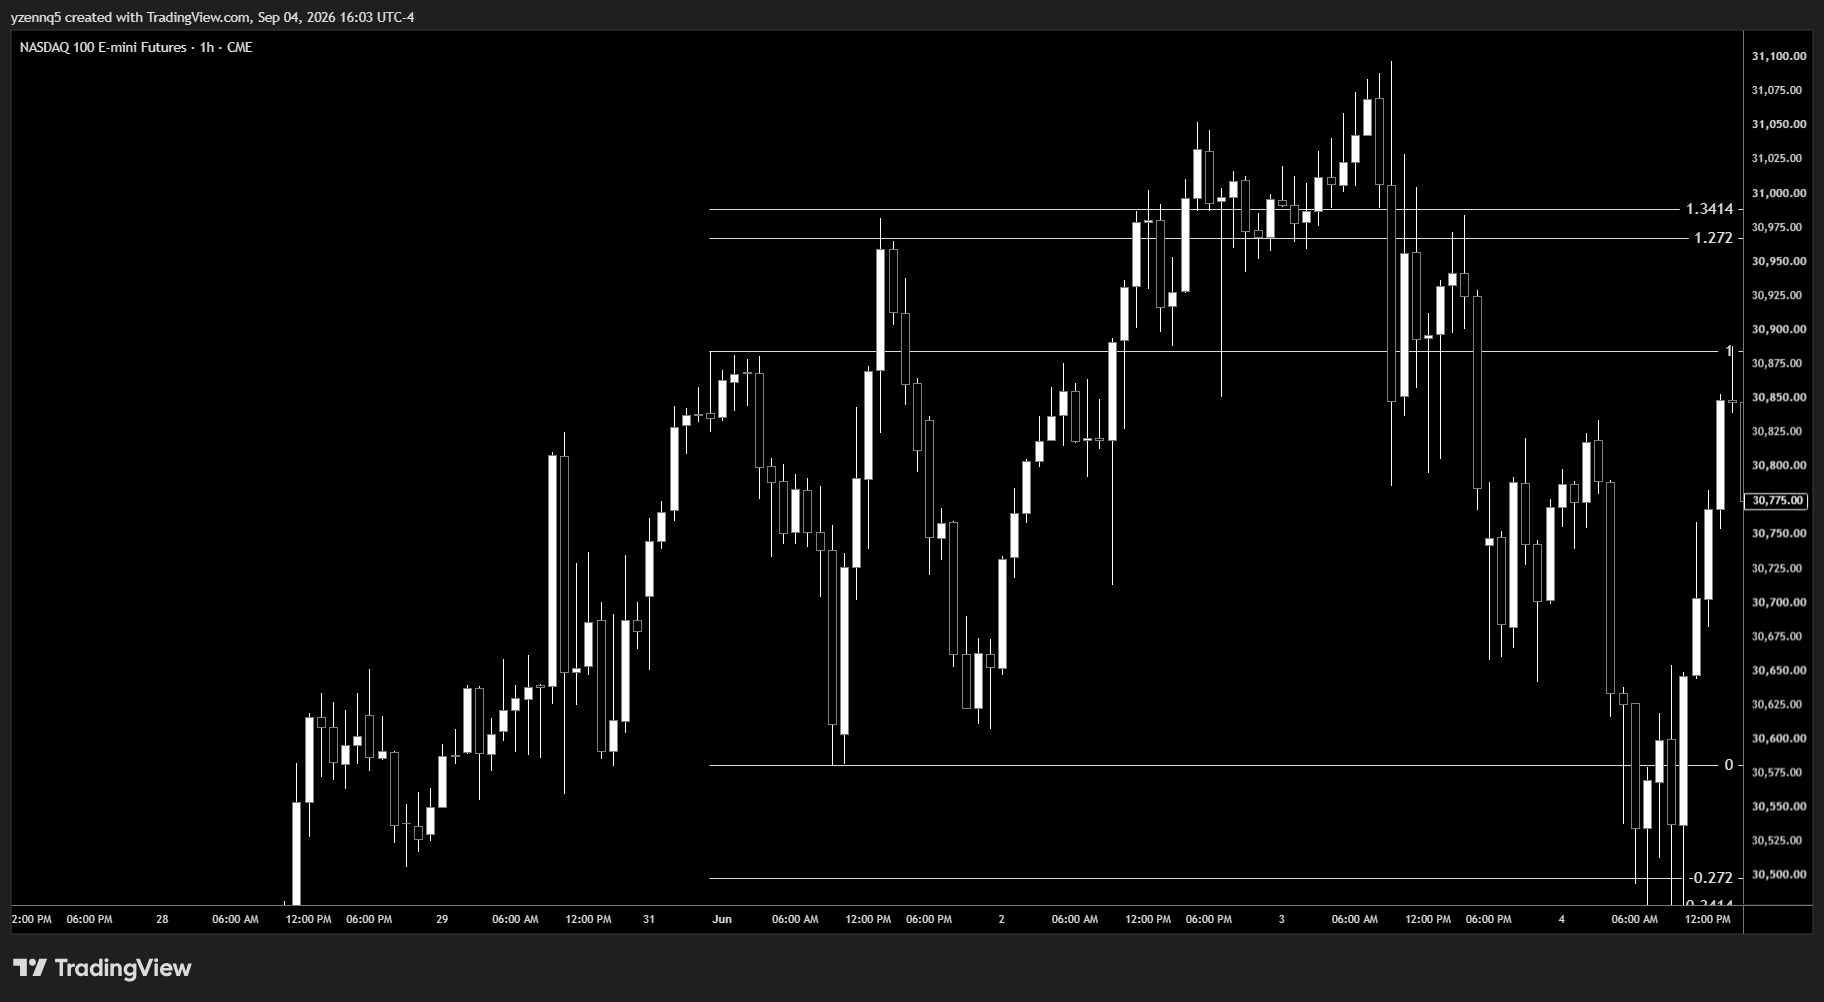
Don't force it. Wait for another swing to form and plot STDV again. A protected swing that has to be argued into existence isn't protected.
Body-to-body plotting works too — often better
Plotting the fib body-to-body (open/close of the swing candles instead of wick-to-wick) is completely valid, not a fallback. In practice STDV aligns on a body-to-body plot roughly 7 times out of 10 — the wick data just introduces noise the body doesn't have. Try body-to-body as a first option, not a last resort.
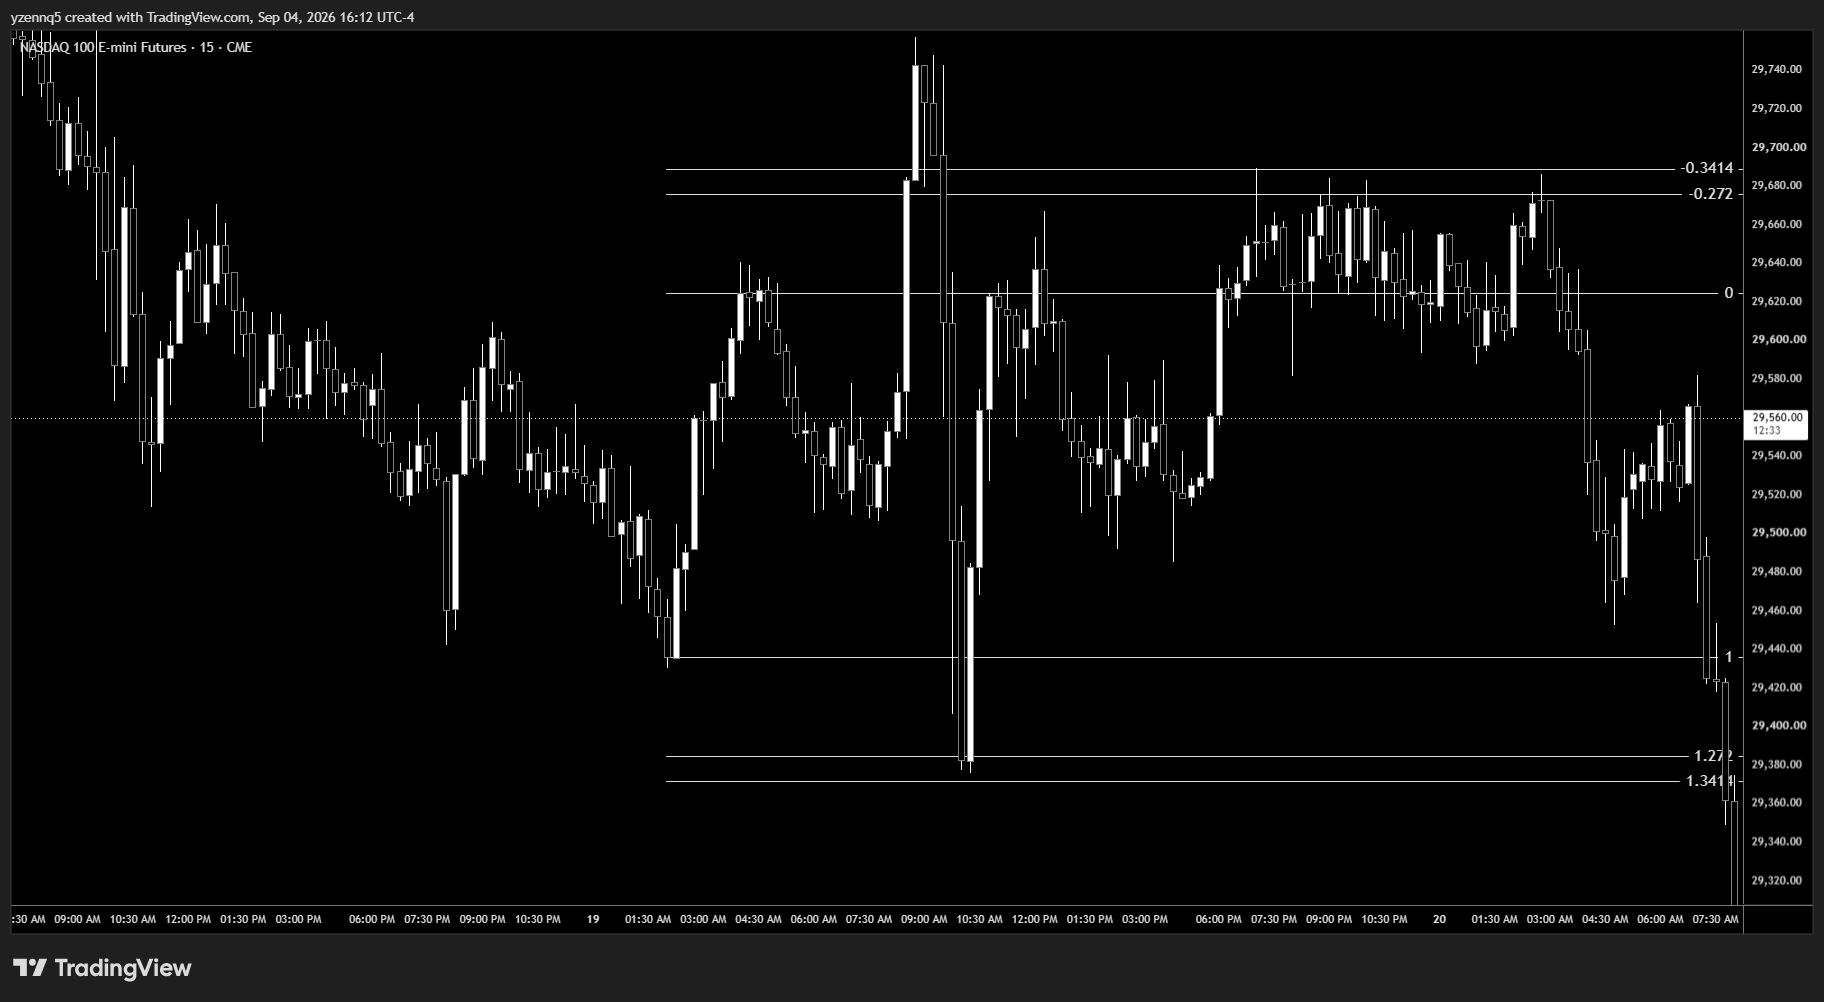
Invalid patterns — know these on sight
The Reading Phase Cycle
Once a high (or low) is protected by STDV, price moves in a repeating cycle. Read where you are in this cycle before acting on gate 5.
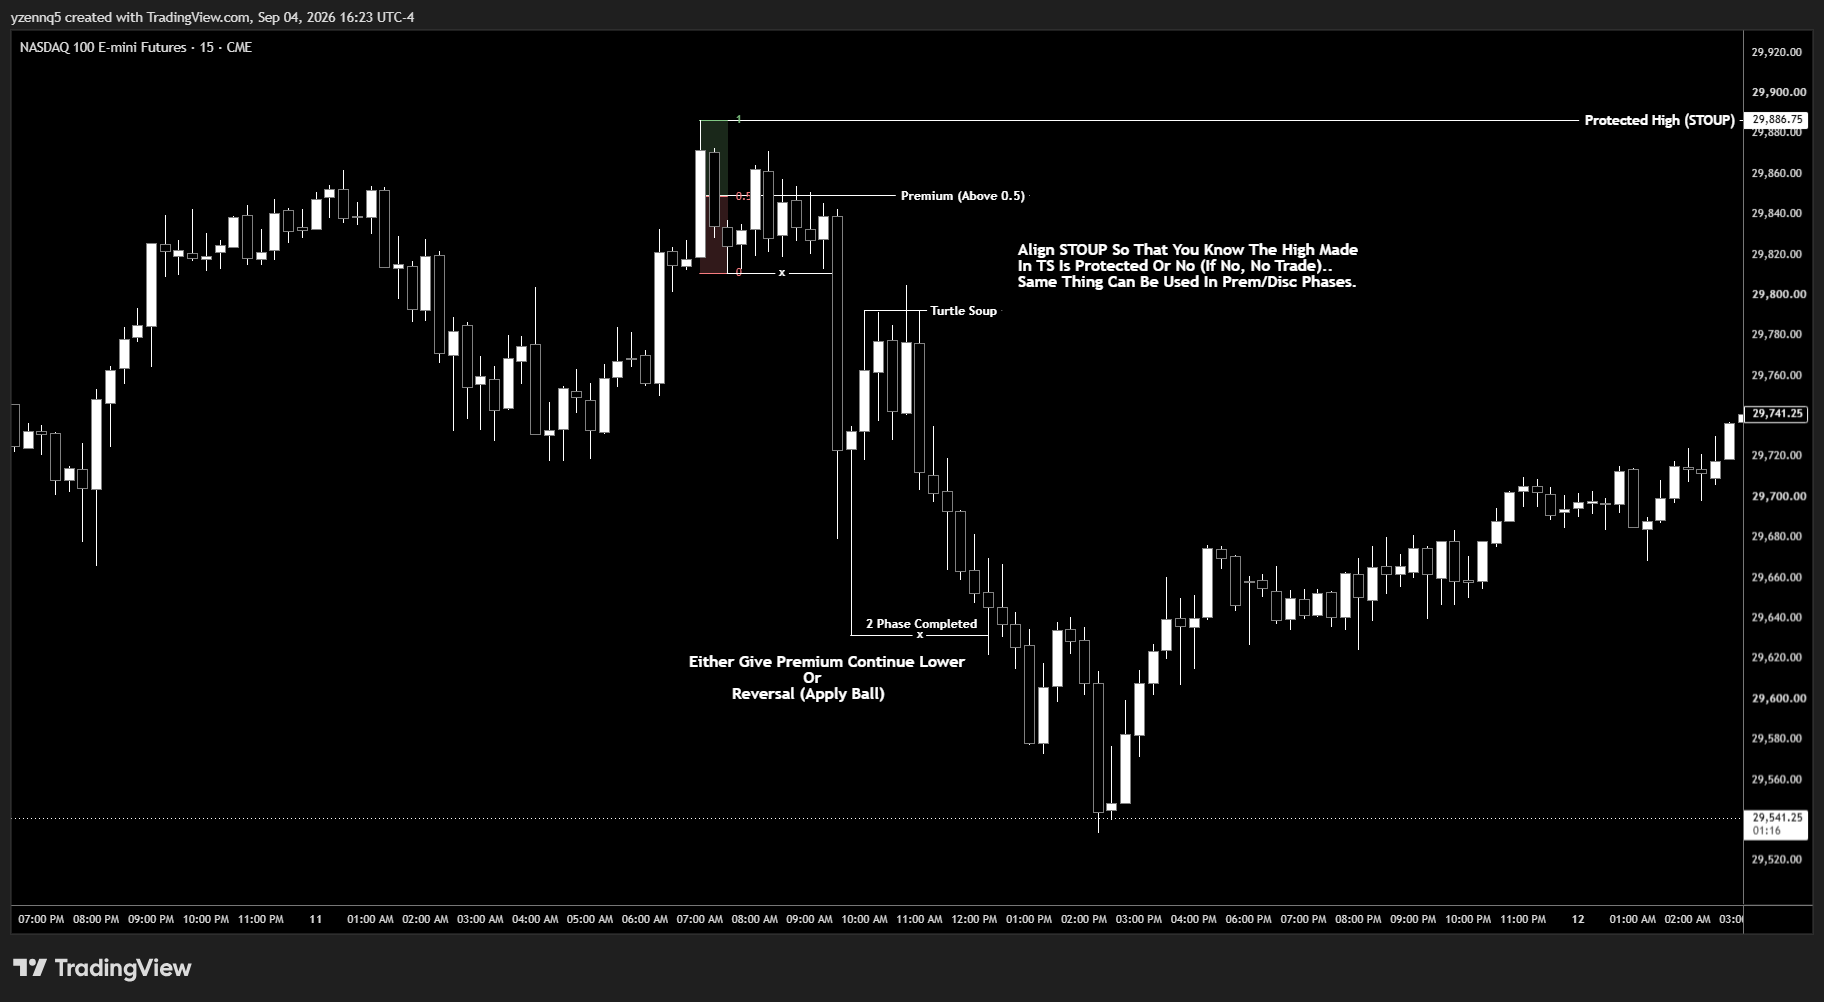
- Price sits in premium 0.5 of the dealing range.
- Dumps below the prior retracement point.
- Forms a Turtle Soup at that lower point.
- Breaks below structure — this is the "2-phase completed" point.
- From here: either premium continues lower, or price reverses — read it with ball knowledge, same STOUP alignment logic applies in both premium and discount phases.
- Returns to premium 0.5 — the cycle repeats.
You only get invalidated during a TS phase. If price dumps or pumps straight through without forming a TS at all, that is not your setup — sit out and wait for the next high-probability read. Don't chase the move you missed.
Fractal Execution & Trade Management
The same six-gate sequence runs identically on every timeframe. A setup that qualifies on the 15-minute chart recurs on the 1-minute chart — same structure, same logic, smaller scale.
| Timeframe | Role |
|---|---|
| 4H | HTF context — dealing range, premium/discount, overall bias. |
| 1H | Ball-knowledge PDA + PO3 confluence, protected swing candidates. |
| 15M | Primary TS + STDV validation timeframe. |
| 3M | Confirms the 15M read is repeating at smaller scale. |
| 1M | Entry refinement — optional 5-second iFVG for precision. |
Entry, stop, target
- Entry — at the protected high/low itself. Can be refined further with a 5-second iFVG for a tighter fill.
- Stop — behind the protected wick. That wick is the invalidation; if it trades through, the read was wrong.
- Target — the next ball-knowledge liquidity draw: premarket high/low (7:00–9:29 AM), the 6:00–8:00 PM range high/low, or the next unmitigated PDA in the direction of the move.
Cracks — When the Swing Is Out of Reach
Sometimes the ideal prior swing needed for TS alignment sits far from current price, or it's unclear whether price will even reach it. In that case, don't abandon the read — plot the same swing point on a correlated asset instead.
- Identify the equivalent swing on ES (or another correlated instrument).
- Check proximity to that swing on the correlated chart instead of the primary one.
- Run the same fractal logic (gates 1–6) on the correlated asset's structure.
- Use the correlated read as confirmation, not as a replacement — the primary asset still has to eventually reflect the same structure.
Correlated instruments (NQ/ES) share the same underlying liquidity narrative. When one chart's key swing is too far away to be actionable, the other often has a cleaner, closer version of the same structural point — same fractal logic, different distance.
Stats & Standing Rules
| Metric | Value |
|---|---|
| Average RR | ~1:5 |
| Win rate (executed correctly, all 6 gates passed) | 64%+ |
| Approach | Discretionary — not mechanical/automatable as-is |
| Time to competency | 2+ weeks of repetition to build pattern recognition |
Standing rules
- Never skip a gate to force a trade. All six pass, or there is no setup.
- The easier the STDV alignment, the higher the probability — difficulty to find = low probability = skip.
- Invalidation only happens during a TS phase — a straight-through move without a TS forming is not your loss, it's a setup that never existed.
- Always ask "has HOD/LOD already printed?" before entering — never assume the range is still open.
- This is discretionary skill. Repetition across 2+ weeks is what builds the read — expect the first attempts to be slow and uncertain.